Whether you are starting a web development project or considering optimising your existing website, WordPress reigns supreme as the go-to platform for crafting dynamic and visually stunning websites.
As WordPress developers and website designers, we understand the importance of not just creating a website but optimising it to its fullest potential.
In this guide, we delve into the depths of WordPress website optimisation, providing you with ten advanced tips to elevate your site’s performance and captivate your audience.
Choosing a Lightweight Theme for Your WordPress Website
Working on WordPress website design journey is an exciting endeavour, filled with endless possibilities for design and functionality.
However, one crucial decision that can significantly impact your site’s performance is selecting the right theme.
In today’s fast-paced digital landscape, users expect websites to load quickly and deliver a seamless browsing experience.
This is where lightweight themes come into play.
A lightweight theme is designed with performance in mind, prioritising speed, efficiency, and minimalism without compromising on aesthetics or functionality.
By opting for a lightweight theme, you can ensure that your WordPress site loads swiftly, retains visitors’ attention, and ranks favourably in search engine results.
Two prime examples of lightweight themes that have garnered widespread acclaim within the WordPress community are Astra and GeneratePress.

Astra:
Renowned for its unparalleled speed and versatility, Astra is a lightweight theme that caters to a diverse range of website needs. Wp Developers often start a project with this theme as a baseline.
With its minimalistic design and modular approach, Astra allows you to build custom websites with ease, whether you’re a seasoned developer or a novice user.
Moreover, Astra’s dedication to performance extends beyond its design, with features such as optimised code, built-in SEO enhancements, and seamless integration with popular page builders like Elementor and Beaver Builder.
GeneratePress:
Another stalwart in the realm of lightweight themes, GeneratePress boasts a remarkable balance of speed, flexibility, and user-friendliness. Its lean codebase and modular architecture ensure rapid loading times and a streamlined user experience across devices. WordPress website designers use GeneratePress for sites which requires fast loading times.
GeneratePress also offers a wealth of customisation options, empowering you to tailor your website to your exact specifications without sacrificing performance.
Furthermore, GeneratePress adheres to best practices in web development, making it an ideal choice for those who prioritise both form and function in their WordPress websites.
When selecting a lightweight theme for your WordPress website creation, it’s essential to consider factors such as speed, compatibility with plugins and page builders, and ongoing support and updates. By choosing a theme like Astra or GeneratePress, you can lay a solid foundation for your website’s success, ensuring optimal performance and user satisfaction from the outset.
Optimising Images for Web: Enhancing Website Performance with Efficient Image Compression
When working on WordPress web development project, the significance of image optimisation cannot be overstated.
High-resolution images, while visually stunning, can impose a heavy burden on website loading times, leading to user frustration and diminished engagement.
To mitigate this issue, WordPress site designers employ advanced image compression techniques to strike the perfect balance between visual quality and loading speed.
One of the most effective methods for optimising images on WordPress websites is utilising dedicated plugins such as Smush or ShortPixel.

These plugins leverage sophisticated algorithms to compress and resize images without perceptibly compromising visual fidelity. Let’s delve into the technical intricacies of how these plugins enhance website performance:
Lossless Compression:
Both Smush and ShortPixel employ lossless compression techniques to reduce the file size of images without sacrificing quality.
Lossless compression works by identifying and eliminating redundant data within image files, resulting in smaller file sizes while preserving every pixel’s integrity.
By seamlessly integrating with WordPress media libraries, these plugins streamline the image optimisation process, allowing developers to effortlessly enhance website performance.
Automatic Image Resizing:
In addition to compression, Smush and ShortPixel offer automatic image resizing functionality, ensuring that images are optimally sized for various viewport dimensions.
This dynamic resizing capability eliminates the need for manual intervention, enabling WordPress websites to deliver optimised images tailored to each user’s device without compromising loading speed or visual quality.
Lazy Loading:
To further enhance website performance, both plugins offer lazy loading functionality, a technique that defers the loading of non-essential images until they are within the user’s viewport.
Lazy loading minimises initial page load times by prioritising the loading of critical content, such as text and interactive elements, while delaying the loading of images further down the page.
This approach not only accelerates perceived page load speed but also conserves bandwidth, particularly on pages with extensive image galleries or multimedia content.
WebP Support:
Smush and ShortPixel also support the WebP image format, a modern and highly efficient image compression format developed by Google.
By converting images to WebP format, WordPress developers can achieve even greater reductions in file size while maintaining exceptional visual quality.
Furthermore, WebP images boast broader browser compatibility and faster loading times compared to traditional image formats, making them an invaluable asset for optimising website performance.
In Summary, the strategic implementation of image optimisation techniques through plugins like Smush and ShortPixel empowers WordPress developers to maximise website performance, enhance user experience, and bolster search engine rankings.
By harnessing the power of lossless compression, automatic resizing, lazy loading, and WebP support, developers can elevate their WordPress websites to new heights of efficiency and effectiveness in the digital landscape.
Implementing Caching for WordPress Websites:
Leverage the power of caching to store static versions of your website’s pages, reducing server load and accelerating page load times. Plugins such as W3 Total Cache or WP Super Cache offer robust caching solutions for WordPress websites.

- Select a Caching Plugin: Begin by choosing a caching plugin such as W3 Total Cache or WP Super Cache from the WordPress plugin repository.
- Install and Activate the Plugin: Navigate to the WordPress dashboard, go to Plugins > Add New, search for your chosen caching plugin, install it, and then activate it.
- Configure Caching Settings: Access the plugin settings page from the WordPress dashboard. Configure caching options such as page caching, browser caching, object caching, and CDN integration based on your website’s requirements and the features offered by the plugin.
- Enable Page Caching: Enable page caching to store static versions of your website’s pages. This allows subsequent visitors to access cached versions of pages instead of generating them dynamically, reducing server load and accelerating page load times.
- Test Caching Implementation: After configuring caching settings, thoroughly test your website to ensure that caching is functioning correctly. Use tools like Pingdom Tools or GTmetrix to analyse page load times and confirm caching effectiveness.
CSS and JavaScript Files:
Minification is the process of removing unnecessary characters from code without altering its functionality. WordPress developers can utilise plugins like Autoptimise to automatically minify CSS and JavaScript files, resulting in faster page rendering.

- Install a Minification Plugin: Install a WordPress plugin such as Autoptimise from the WordPress plugin repository. Alternatively, some caching plugins, such as W3 Total Cache, offer built-in minification features.
- Access Plugin Settings: Navigate to the plugin settings page from the WordPress dashboard. Locate the options related to CSS and JavaScript minification.
- Enable Minification: Enable CSS and JavaScript minification options within the plugin settings. This instructs the plugin to remove unnecessary characters, such as whitespace and comments, from CSS and JavaScript files without altering their functionality.
- Configure Additional Settings (Optional): Depending on the plugin, you may have the option to configure additional settings such as combining multiple CSS or JavaScript files into a single file for improved performance.
- Test Minification: After enabling minification, thoroughly test your website to ensure that CSS and JavaScript files are minified correctly. Verify that website functionality remains intact while experiencing faster page rendering times.
Enabling GZIP Compression:
GZIP compression reduces the size of your website’s files before they are sent to the browser, effectively decreasing loading times.
WordPress website designers can enable GZIP compression through plugins like WP Rocket or by configuring server settings.

- Check Server Support: Before enabling GZIP compression, ensure that your web hosting server supports this feature. Most modern web servers, such as Apache and Nginx, support GZIP compression by default.
- Install a GZIP Compression Plugin (Optional): While GZIP compression can be enabled through server configurations, WordPress website designers can opt to use plugins like WP Rocket for easier implementation.
- Access Plugin Settings (If Using Plugin): If using a plugin, navigate to the plugin settings page from the WordPress dashboard. Locate the options related to GZIP compression.
- Enable GZIP Compression: Enable GZIP compression within the plugin settings. This instructs the plugin to compress your website’s files, including HTML, CSS, JavaScript, and other resources, before sending them to the browser.
- Configure Server Settings (If Not Using Plugin): If you prefer to configure GZIP compression directly on the server, access your server’s configuration files (e.g., .htaccess for Apache servers) and add directives to enable GZIP compression for specific file types.
- Test Compression: After enabling GZIP compression, test your website using tools like GTmetrix or Google PageSpeed Insights to verify that GZIP compression is active and effectively reducing file sizes, thereby decreasing loading times.
Utilise Content Delivery Networks (CDNs):
Content Delivery Networks distribute your website’s content across multiple servers worldwide, ensuring rapid delivery to users regardless of their geographical location. Integrate CDNs such as Cloudflare or StackPath with your WordPress site for enhanced performance.
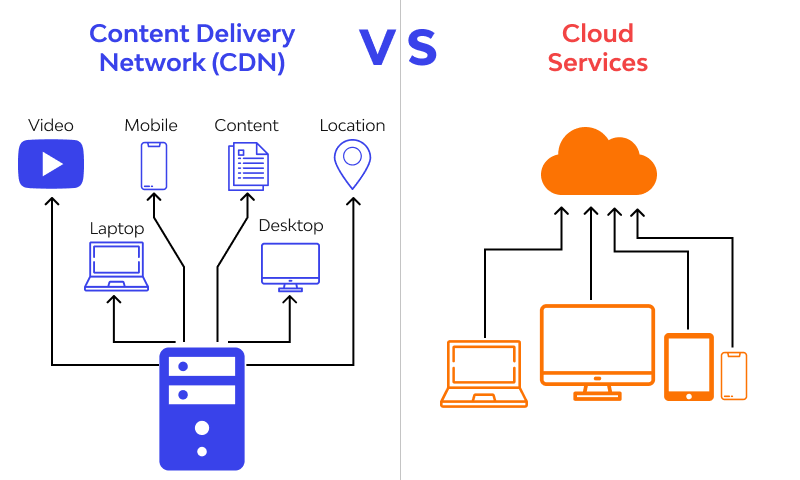
- Choose a CDN Provider: Begin by selecting a CDN provider such as Cloudflare or StackPath based on your website’s needs, budget, and desired features.
- Sign Up and Configure CDN: Sign up for an account with your chosen CDN provider and follow their setup instructions to configure your CDN. This typically involves adding your website to the CDN’s dashboard, configuring DNS settings, and verifying domain ownership.
- Install CDN Integration Plugin (Optional): Some CDN providers offer WordPress integration plugins for seamless implementation. Install and activate the plugin from the WordPress plugin repository if available.
- Integrate CDN with WordPress: Access the CDN settings within your WordPress dashboard or the CDN provider’s dashboard. Configure settings such as caching options, content delivery rules, and security settings to optimise CDN performance for your website.
- Test CDN Implementation: After integrating the CDN with your WordPress site, thoroughly test your website to ensure that content is being delivered via the CDN. Use tools like Pingdom Tools or GTmetrix to analyse page load times and confirm CDN effectiveness across different geographical locations.
Optimise Database Tables:
Regularly clean and optimise your WordPress database to eliminate unnecessary clutter and improve overall site performance. Plugins like WP-Optimize or Advanced Database Cleaner streamline this process, keeping your site running smoothly.
- Install a Database Optimisation Plugin: Install a WordPress plugin such as WP-Optimise or Advanced Database Cleaner from the WordPress plugin repository.
- Access Plugin Settings: Navigate to the plugin settings page from the WordPress dashboard. Locate the options related to database optimisation and cleaning.
- Configure Optimisation Settings: Configure settings such as automatic scheduling of database optimisation tasks, selection of specific database tables to optimise, and cleanup of redundant data such as post revisions and spam comments.
- Execute Database Optimisation: Initiate the database optimisation process either manually or automatically based on your configured settings. The plugin will clean up and optimise database tables to eliminate unnecessary clutter and improve overall site performance.
- Monitor Database Health: Regularly monitor the health of your WordPress database using the plugin’s diagnostic tools. Keep track of database size, fragmentation, and performance metrics to identify any potential issues that may require attention.
Enable Lazy Loading:
Lazy loading delays the loading of non-essential resources, such as images and videos, until they are needed, conserving bandwidth and speeding up initial page load times. Implement lazy loading with plugins like Lazy Load by WP Rocket for effortless optimisation.

- Install a Lazy Loading Plugin: Install a WordPress plugin such as Lazy Load by WP Rocket from the WordPress plugin repository.
- Access Plugin Settings: Navigate to the plugin settings page from the WordPress dashboard. Locate the options related to lazy loading of images and videos.
- Enable Lazy Loading: Enable the lazy loading feature within the plugin settings. This instructs the plugin to delay the loading of non-essential resources, such as images and videos, until they are needed, conserving bandwidth and speeding up initial page load times.
- Customise Lazy Loading Settings (Optional): Depending on the plugin, you may have the option to customise lazy loading settings, such as specifying loading thresholds, exclusion rules for certain content types, and animation effects.
- Test Lazy Loading Implementation: After enabling lazy loading, thoroughly test your website to ensure that images and videos are being lazy loaded as expected. Verify that page load times are improved, and user experience is enhanced across different devices and network conditions.
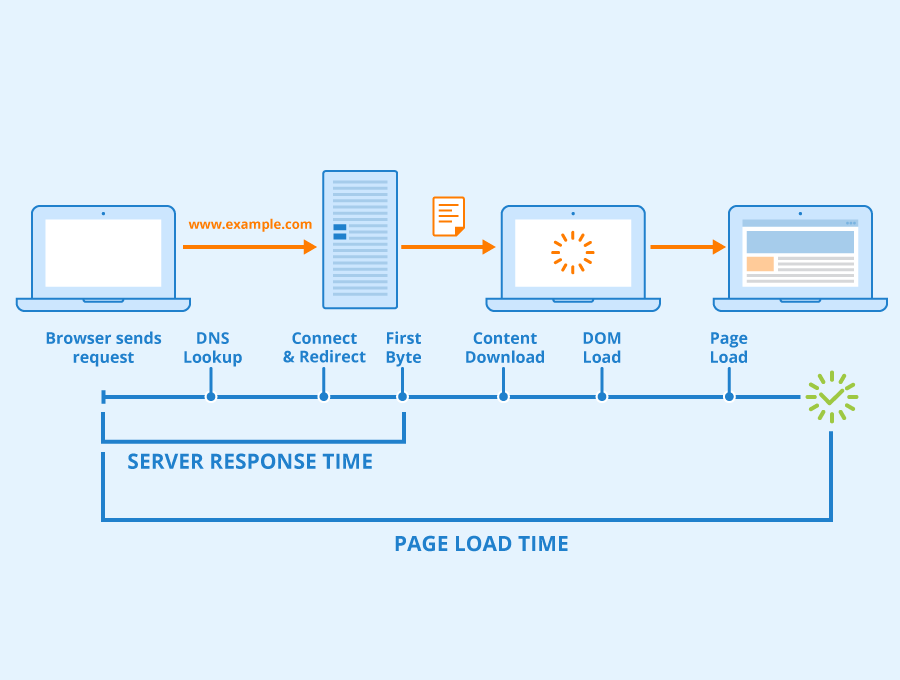
Reduce Server Response Time:
A quick server response time is crucial for delivering content swiftly to your audience. WordPress developers can achieve this by choosing a reputable hosting provider, optimising server configurations, and utilising caching mechanisms effectively.
- Choose a Reputable Hosting Provider: Begin by selecting a reputable hosting provider that offers reliable server infrastructure and optimal performance for WordPress websites. Consider factors such as server uptime, speed, scalability, and customer support.
- Optimise Server Configurations: Access your hosting account’s control panel or server management interface to optimise server configurations. This may involve adjusting server settings such as PHP version, memory limits, and caching mechanisms to improve server response time.
- Utilise Caching Mechanisms Effectively: Implement caching mechanisms such as opcode caching (e.g., OPcache), object caching (e.g., Redis or Memcached), and server-side caching (e.g., Varnish) to reduce server load and accelerate content delivery. Configure caching plugins or server settings to cache static and dynamic content efficiently.
- Enable Content Compression: Enable compression techniques such as GZIP compression to reduce the size of transmitted data between the server and clients’ browsers. This reduces bandwidth usage and improves server response time by delivering compressed content faster.
- Optimise Database Queries: Optimise database queries within your WordPress website to improve query performance and reduce server response time. Use database optimisation plugins or manually optimise queries by eliminating inefficiencies and reducing query execution times.
- Monitor Server Performance: Regularly monitor server performance metrics such as CPU usage, memory usage, and response time using server monitoring tools or built-in hosting dashboards. Identify any bottlenecks or performance issues and take corrective actions to optimise server response time.
Regularly Update Plugins and Themes:
Stay vigilant with plugin and theme updates to ensure compatibility, security, and performance improvements. Outdated plugins and themes can introduce vulnerabilities and hinder your website’s overall optimisation efforts.

- Access Plugin and Theme Management: Navigate to the Plugins and Themes sections within the WordPress dashboard to manage installed plugins and themes.
- Check for Updates: Regularly check for updates to installed plugins and themes. Look for notifications indicating available updates next to plugin and theme names.
- Update Plugins: Select the plugins that have available updates and click on the “Update Now” button to install the latest versions. Alternatively, bulk-select multiple plugins for simultaneous updating.
- Update Themes: Similarly, update themes by selecting the themes with available updates and clicking on the “Update Now” button. Ensure that you update both parent themes and child themes if applicable.
- Review Plugin and Theme Compatibility: After updating plugins and themes, review website functionality to ensure compatibility with the latest versions. Test critical features, pages, and functionalities to verify that updates haven’t introduced any issues.
- Monitor Plugin and Theme Compatibility: Continuously monitor plugin and theme compatibility with WordPress core updates and other plugins. Address any compatibility issues promptly by updating plugins, themes, or seeking alternative solutions.
- Enable Automatic Updates (Optional): Consider enabling automatic updates for plugins and themes to ensure timely installation of security patches, bug fixes, and performance improvements. Use caution when enabling automatic updates and regularly monitor website stability post-update.
By incorporating these advanced WordPress website optimisation tips into your workflow, you can transform your site into a blazing-fast, user-friendly masterpiece. Whether you’re a seasoned wp developer or a budding WordPress web designer, embracing these techniques will undoubtedly elevate your website creation with WordPress to new heights of excellence. Unlock the full potential of WordPress and leave a lasting impression on your audience with a seamlessly optimised website.